Appearance
Tracking Events
Events measure how many visitors took a particular action, such as clicking a button or filling out a form, and calculate the conversion rate and (optional) average time. You can filter the dashboard by events and track additional metadata fields (key-value pairs).
The main difference from conversion goals is that you can programmatically control when an event is sent and attach metadata.
INFO
Events count towards your billable monthly page views.
DANGER
You must ensure that no Personally Identifiable Information (PII) is sent within a metadata field. All other information is anonymized, as is the case for page views. PII includes any information that can be used to uniquely identify an individual, such as the full name, email address, phone or credit card number, etc.
Limits
There are limits to how many events you can send and how they are structured:
- You can send up to 20 metadata key-value pairs
- The metadata key can be up to 100 characters long
- The metadata value can be up to 2000 characters long
Note that tags are automatically attached to events if you use the JavaScript snippet integration. These also count towards the limits.
Creating Events
Events are automatically created and added to your dashboard when you send them. They can be sent from your website using JavaScript, or from your backend using our API or one of our SDKs.
By default, an event counts as an interaction, which marks the session as not bounced. You can change this by adding the non_interactive parameter.
Sending Events From Your Website
Before you can send your first event, you need to add the pa.js JavaScript snippet to your website.
The data-exclude and data-include attributes can be used to ignore events on certain pages. Please refer to the website integration for details.
Please note that firing an event immediately on page load can result in duplicate sessions. See the example below for details.
Example 1: Using CSS Classes
If you don't have access to the HTML of your website and cannot or don't want to use JavaScript, adding CSS classes is the easiest way to add event tracking. The downside is that only click events are supported at the moment. The example below will trigger an event when the button is clicked.
HTML
<!-- pirsch-non-interactive is optional and will make the session count as bounced, even if the event is triggered. -->
<button class="pirsch-event=Event+Name pirsch-meta-key=Meta+Value pirsch-duration=32 pirsch-non-interactive">
    Button
</button>
The event name is set by adding the pirsch-event=<Name> class. Plus characters will be replaced with a space.
You can add as many pirsch-meta-<Key>=<Value> classes as you want. They'll be attached as metadata to the event.
pirsch-duration=<Number> can be used to send a number that the average of will be displayed on the events details panel.
Example 2: Using HTML Attributes
If you have access to the HTML of your website, adding attributes is an easy way to add event tracking. The downside is that only click events are supported at the moment. The example below will trigger an event when the button is clicked.
HTML
<!-- data-pirsch-non-interactive is optional and will make the session count as bounced, even if the event is triggered. -->
<button data-pirsch-event="Event Name" data-pirsch-meta-key="Meta Value" data-pirsch-duration="32" data-pirsch-non-interactive>
    Button
</button>
The event name is set by adding the data-pirsch-event="<Name>" attribute.
You can add as many data-pirsch-meta-<Key>="<Value>" parameters as you want. They'll be attached as metadata to the event.
data-pirsch-duration="<Number>" can be used to send a number that the average of will be displayed on the events details panel.
Example 3: Using JavaScript
Here is a simple example of how to send an event at the click of a button using JavaScript.
HTML
<button id="button">Send Event</button>

<script>
    // Wait until the page has finished loading before adding the event listener.
    document.addEventListener("DOMContentLoaded", () => {
        let clicks = 1;

        // You might need to use a different selector, like if you have other elements in your button.
        // See the second example on how you could solve that.
        document.getElementById("button").addEventListener("click", () => {
            pirsch("Button Clicked", {
                duration: 42,
                meta: {
                    Clicks: clicks
                },
                // non_interactive is optional and will make the session count as bounced, even if the event is triggered.
                // non_interactive: true
            }).then(() => {
                clicks++;
            }).catch(e => {
                console.error(e); // log the error but still count up
                clicks++;
            });
        });
    });
</script>
The script sends an event on every button click and adds one to the counter. The important part here is the call to the pirsch function. The first parameter is the event name, followed by optional parameters. The duration parameter can be used to send a number (seconds) with the event, which is used to calculate the average duration. This can be the time spent on the page, for example, or anything you want, such as the time it took to read a blog post. The 'meta' parameter is an object containing key-value pairs and is displayed below the event on the dashboard. The attached metadata can be used later to further break down the event. Note that you can only use string values. There is no limit to the number of metadata fields you can send.
The function returns a promise, which you can use to continue with your code after the event has been sent, or to handle any errors. We recommend that you perform your action even if the event cannot be sent, to avoid any interruption.
Example 4: Tracking a Form Submission
Here is an example of how you can use events to track form submissions. Note that you should be careful about what data you include in the metadata. PII (personally identifiable information) should be removed before sending it to Pirsch, or you will need the user's consent.
HTML
<form method="post" id="form">
    <label>Message</label>
    <input type="text" name="message" id="message" required />
    <input type="submit" value="Submit" />
</form>

<script>
    // Wait until the page has fully loaded.
    document.addEventListener("DOMContentLoaded", () => {
        // We prevent the form submission first, to allow the event to being tracked.
        let preventSubmission = true;

        // Get the form using the id attribute and add a submission event handler.
        document.getElementById("form").addEventListener("submit", e => {
            // Prevent on submit. We will re-trigger the event after the Pirsch event has been submitted.
            if (preventSubmission) {
                e.preventDefault();
                preventSubmission = false;
            }

            // Get the input field.
            const input = document.getElementById("message");

            // Send the event to Pirsch.
            pirsch("Form Submission", {
                meta: {
                    message: input.value
                }
            })
            .then(() => {
                // On success, re-trigger the event to submit the form.
                e.target.submit();
            })
            .catch(() => {
                // On error, re-trigger the event to submit the form.
                e.target.submit();
            });
        });
    });
</script>
The script adds an event listener to the form. When it is submitted, an event is sent to Pirsch, including the message entered by the user as metadata.
Example 5: Tracking an Event on Page Load
Tracking an event on page load requires delaying the event for a few milliseconds, otherwise it would collide with the page view. Triggering an event for a visitor who doesn't already have a session will create a new session. If the page view is sent at the same time, two sessions are immediately created for the same visitor. To avoid this problem, a short delay should be added.
A better solution would be to append the required metadata fields to the page view itself using tags.
Here is an example of a delayed event. 200 milliseconds should be fine in most cases.
HTML
<script>
    // Wait until the page has fully loaded.
    document.addEventListener("DOMContentLoaded", () => {
        // Set a 200 millisecond timeout before triggering the event.
        setTimeout(() => {
            // Send the event to Pirsch.
            pirsch("Page Load Event", {
                meta: {
                    some: "thing"
                }
                // non_interactive is optional and will make the session count as bounced, even with the event triggered.
                non_interactive: true
            });
        }, 200);
    });
</script>
Example 6: Tracking Events via Meta Tags
It's possible to attach events via meta tags. This often allows configuring your own events without the need to add additional JavaScript to your page. Here is an example.
HTML
<head>
    <title>Demo</title>
    <!-- Other stuff inside your HTML <head> section. -->
    <!-- ... -->

    <meta name="pirsch-event"
        data-pirsch-selector=".pirsch-meta-event"
        data-pirsch-event="Meta Event"
        data-pirsch-trigger="click"
        data-pirsch-meta-key="value"
        data-pirsch-meta-foo="bar"
        data-pirsch-non-interactive />
</head>

<!-- Inside the body tag, add a button with the selector configured above (class="pirsch-meta-event" in this case). -->
<button class="pirsch-meta-event">Click Me</button>
The meta tag needs to be placed inside the <head> section, like any other meta tag. The name attribute must be set to pirsch-event. The event name data-pirsch-event and selector data-pirsch-selector are mandatory. The selector will be used to find the elements on page which this event should be attached to (using document.querySelectorAll("your-selector")).
You can configure a trigger data-pirsch-trigger. It will be set to click by default. You can use any other event trigger as described here.
data-pirsch-non-interactive will mark the event as non-interactive.
To attach meta data, you can add data-pirsch-meta-key="value" attributes. The part after data-pirsch-meta- will be used as the key. So, for the example above, two meta data fields will be attached: key=value and foo=bar.
More Examples
We have a demo repository on GitHub that shows different ways to integrate and use Pirsch. It also includes more advanced examples, such as tracking the play time of Vimeo and YouTube videos.
Sending Events From Your Backend
Sending an event from your backend works just like submitting a page view, except that you need to append the event name, duration and metadata fields. Before you can use the backend integration, make sure you created a client. You can then use the client to send an event.
Testing
Events are ignored on localhost and printed to the console instead. You can open the browser console to confirm that an event is being sent in production. The output should look something like this
Pirsch event: Button Clicked {"duration":42,"meta":{"Clicks":1}}Dashboard and Filtering
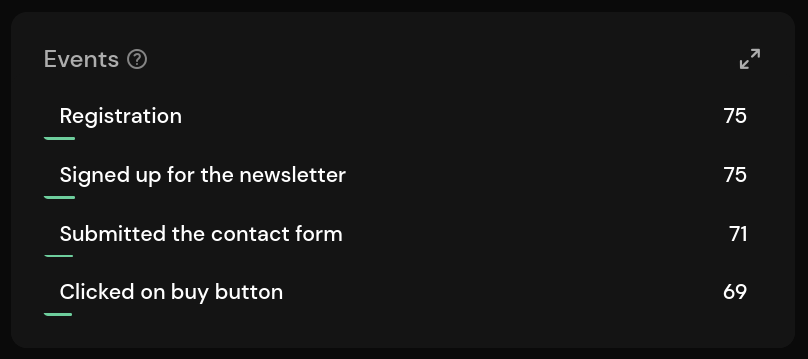
Events are listed in their own panel on the dashboard. The panel is available if you have sent at least one event within the selected time period. It shows the number of unique visitors and the conversion rate, and can be expanded to show more details. You can click on an event to filter for it.
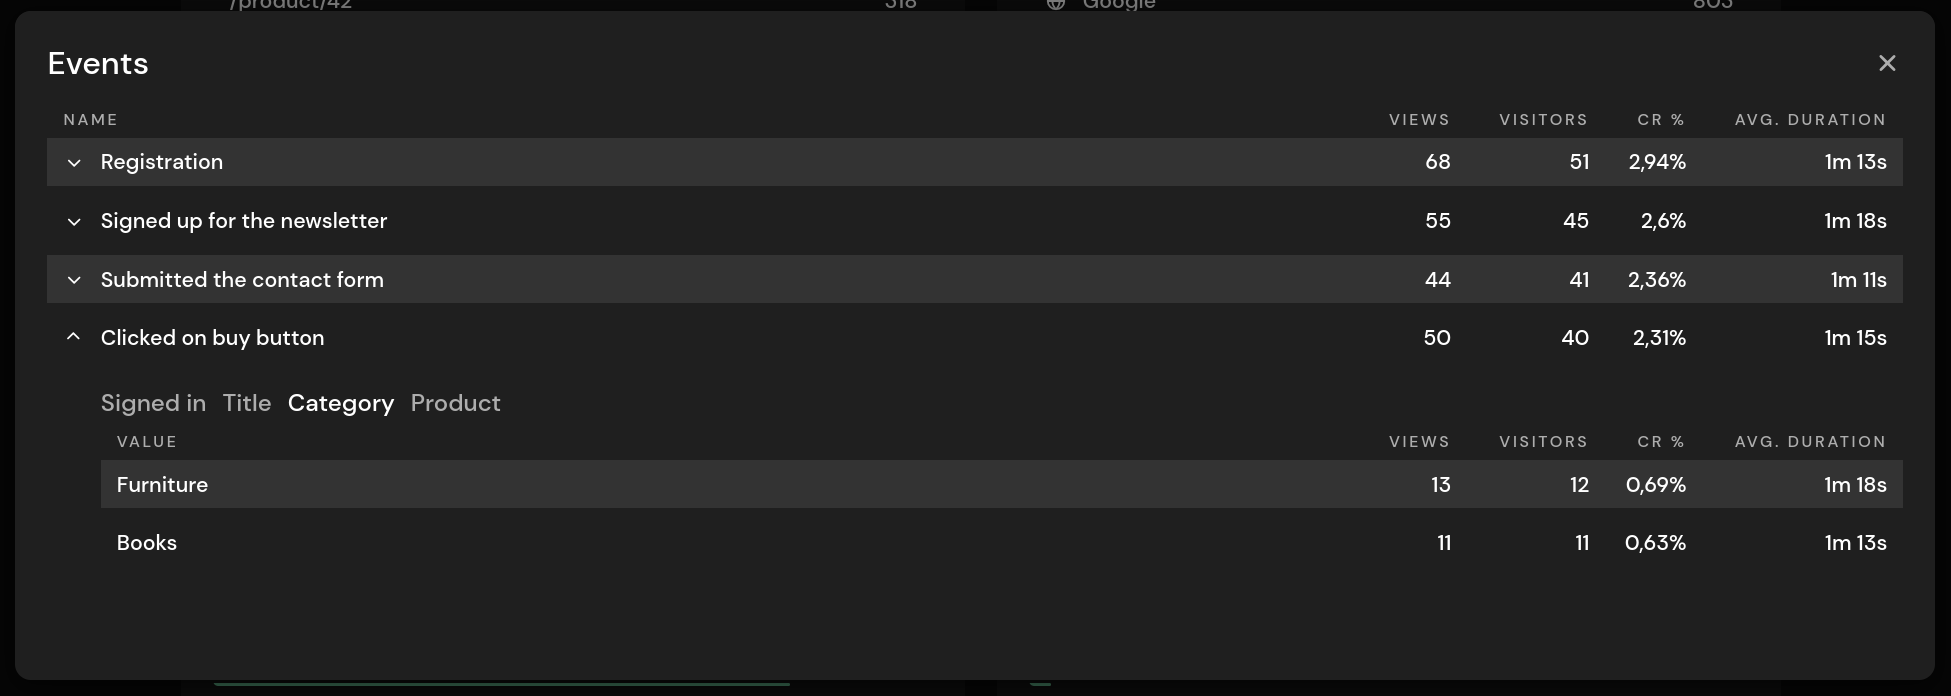
The detailed view shows the event name, the number of views, the number of unique visitors, the conversion rate, and the average duration.
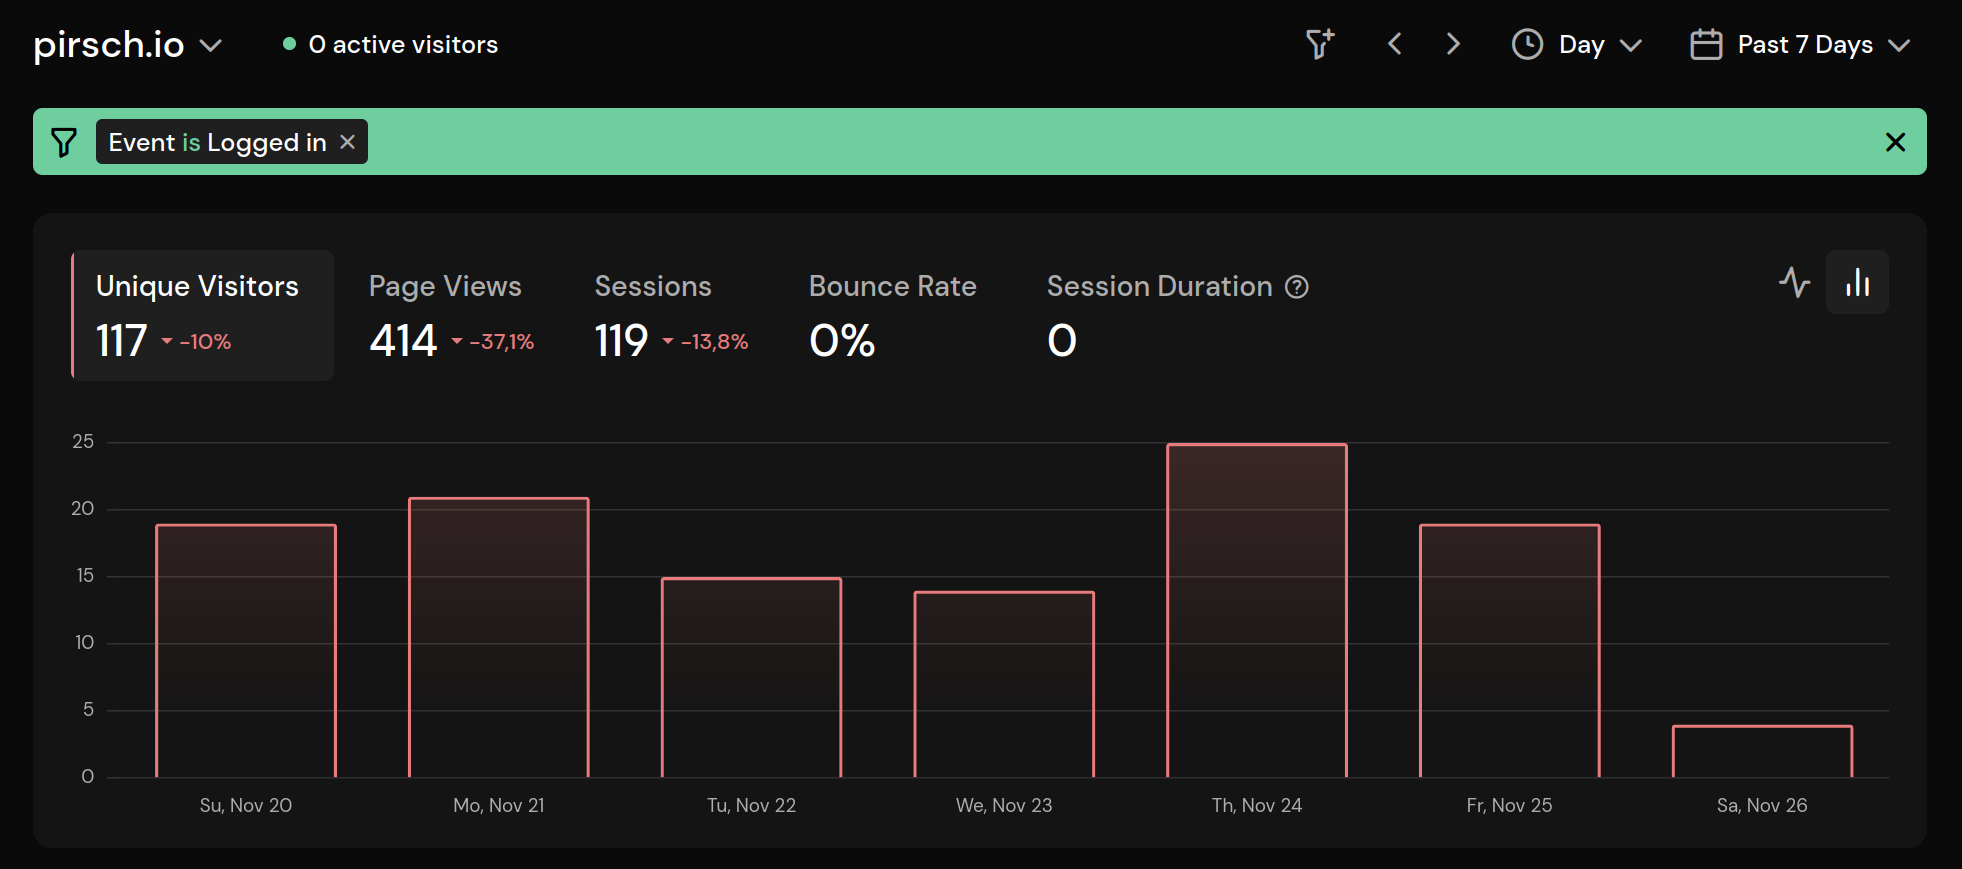
To filter for an event, click on one of the entries in the Panel or Detail view. It will be added to the list of filters. Here is an example for all visitors who have subscribed to the newsletter. Panels that are not relevant to events (such as number of sessions, average time on page, etc.) will be hidden.
You can also filter for metadata. Simply click the entry in the detailed view below the event.