Appearance
Shopify
Pirsch can be easily integrated into Shopify in minutes. In this article, you'll learn how to set it up and use custom code to track events, sales, and revenue.
A more advanced integration can be implemented using the API. This requires programming skills. A plugin may be available in the App Store, but we don't currently provide one ourselves.
Adding the Script to Shopify
The Pirsch JavaScript snippet needs to be added to two places on your Shopify site.
Adding the Snippet to the Theme
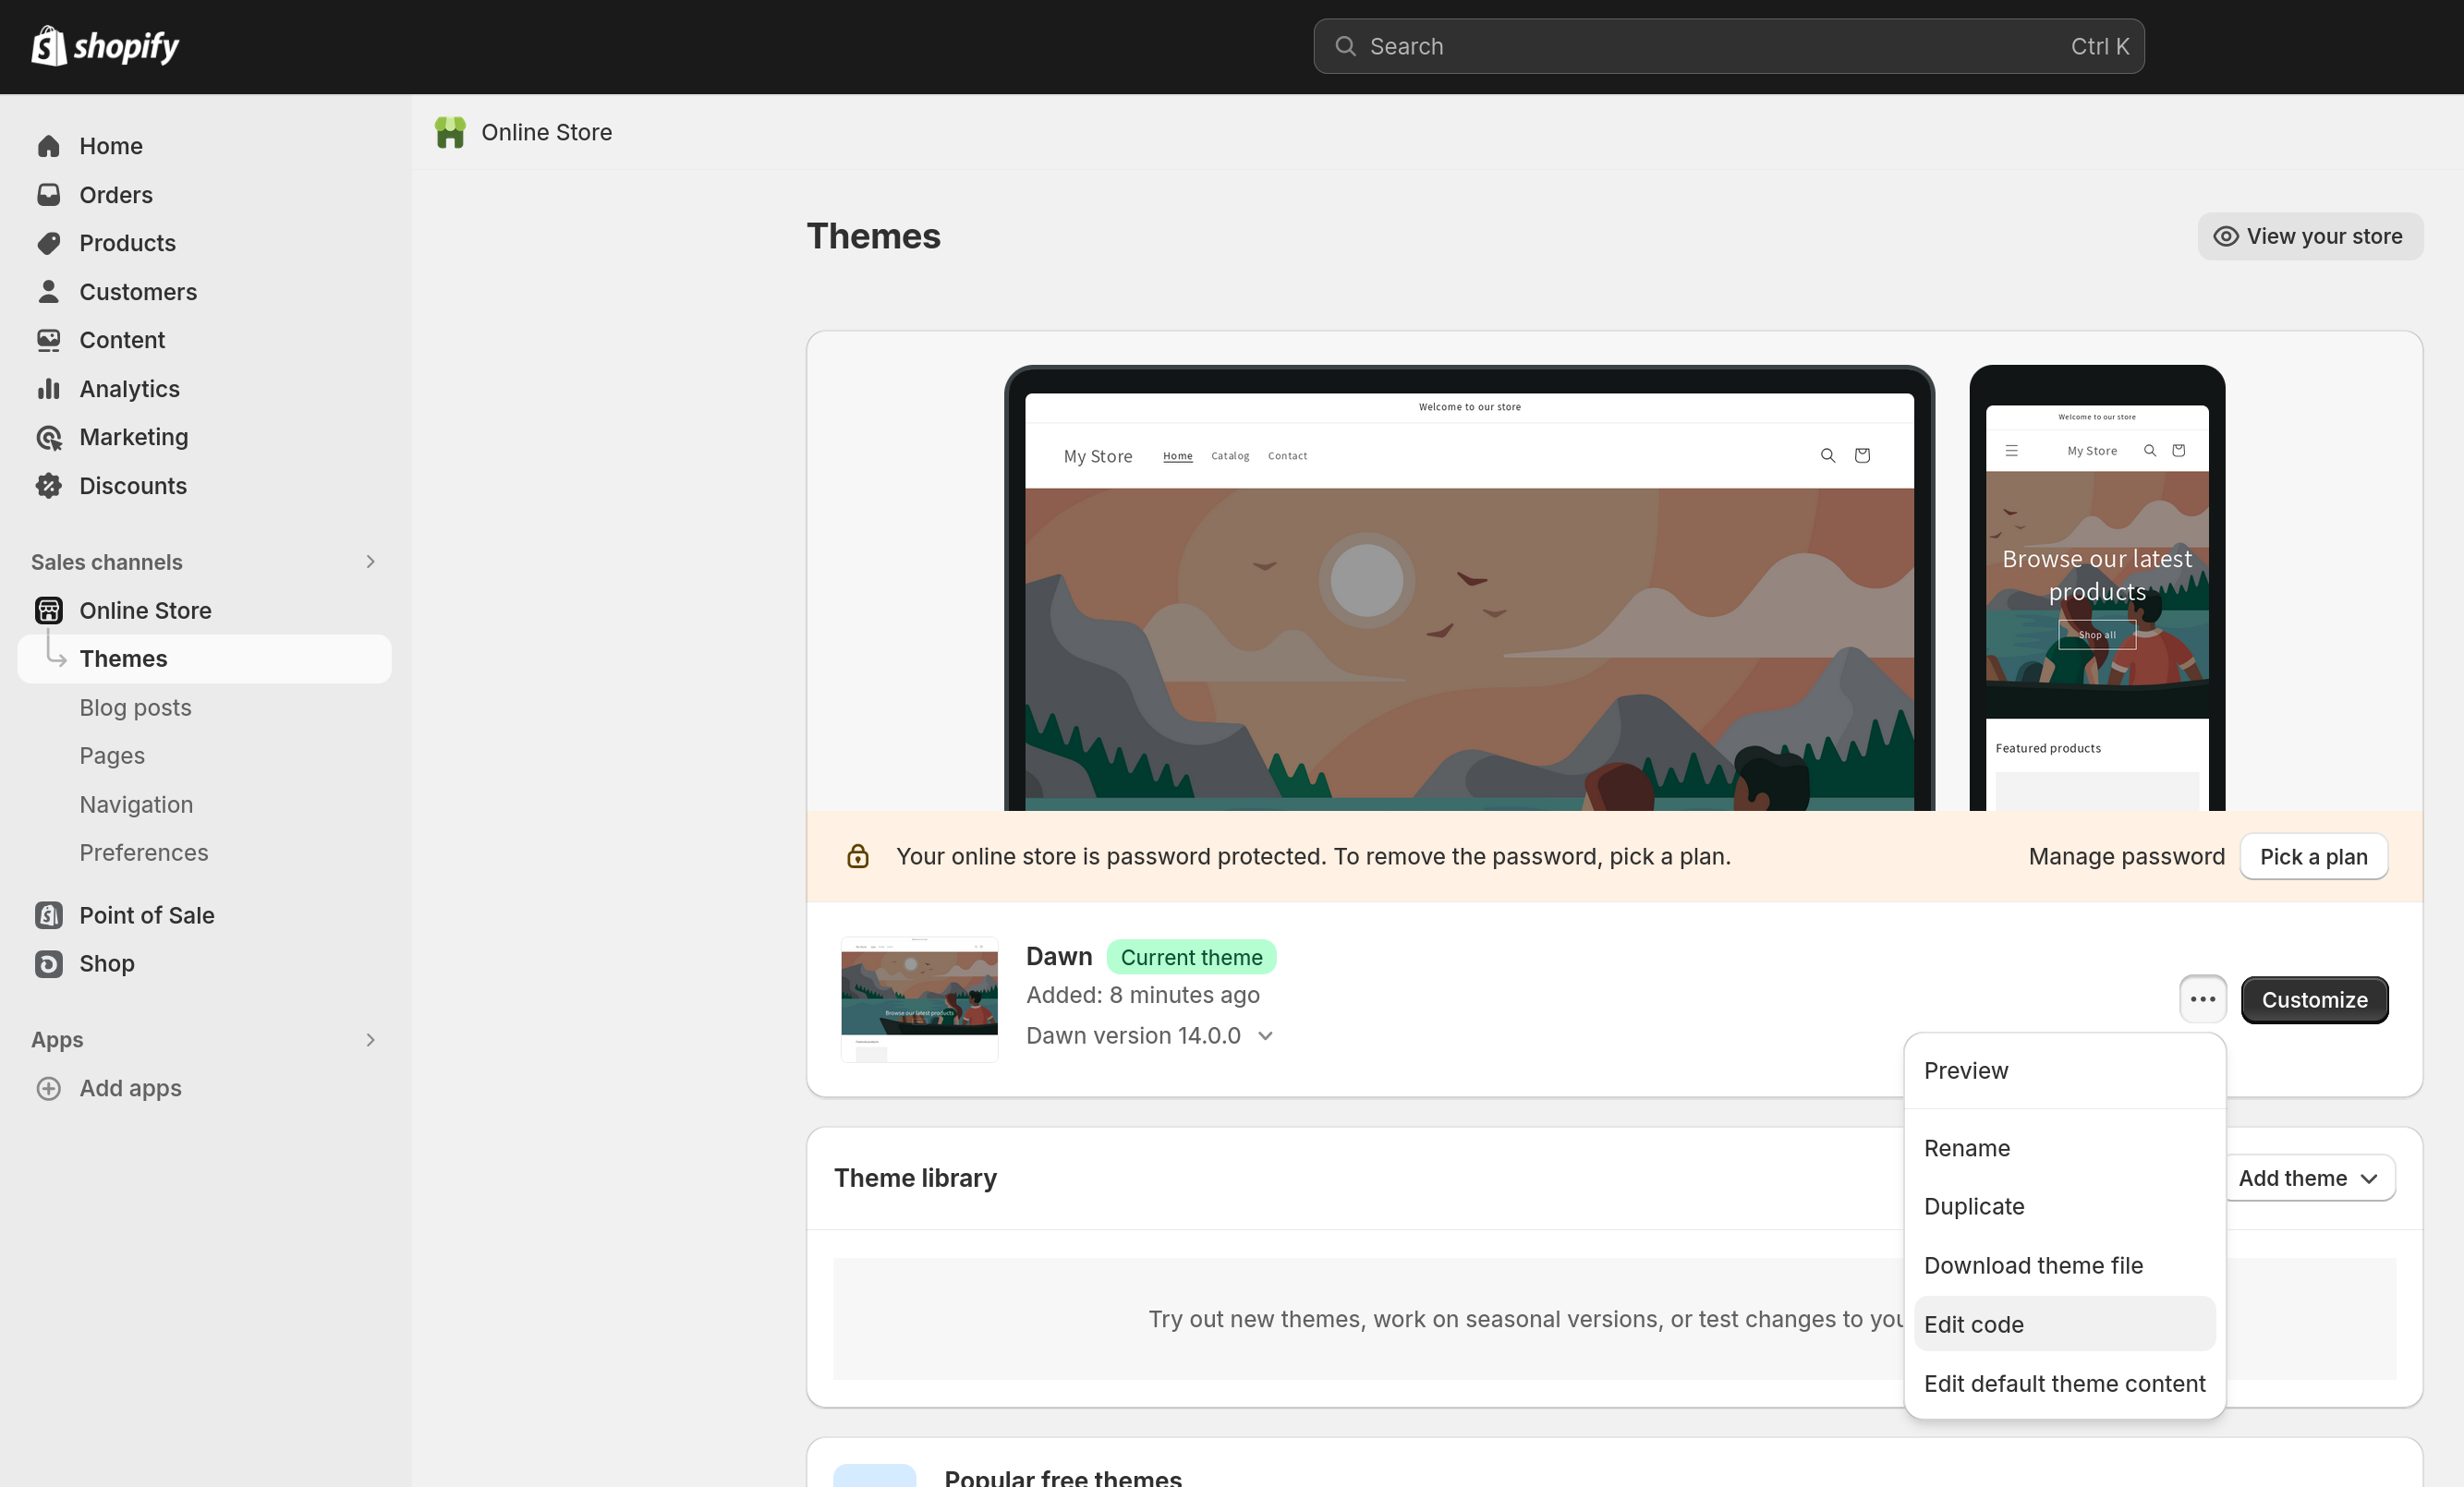
Log in to your Shopify account and navigate to the Themes section of your Online Store. Click the extended settings next to the Customize button and select Edit code.
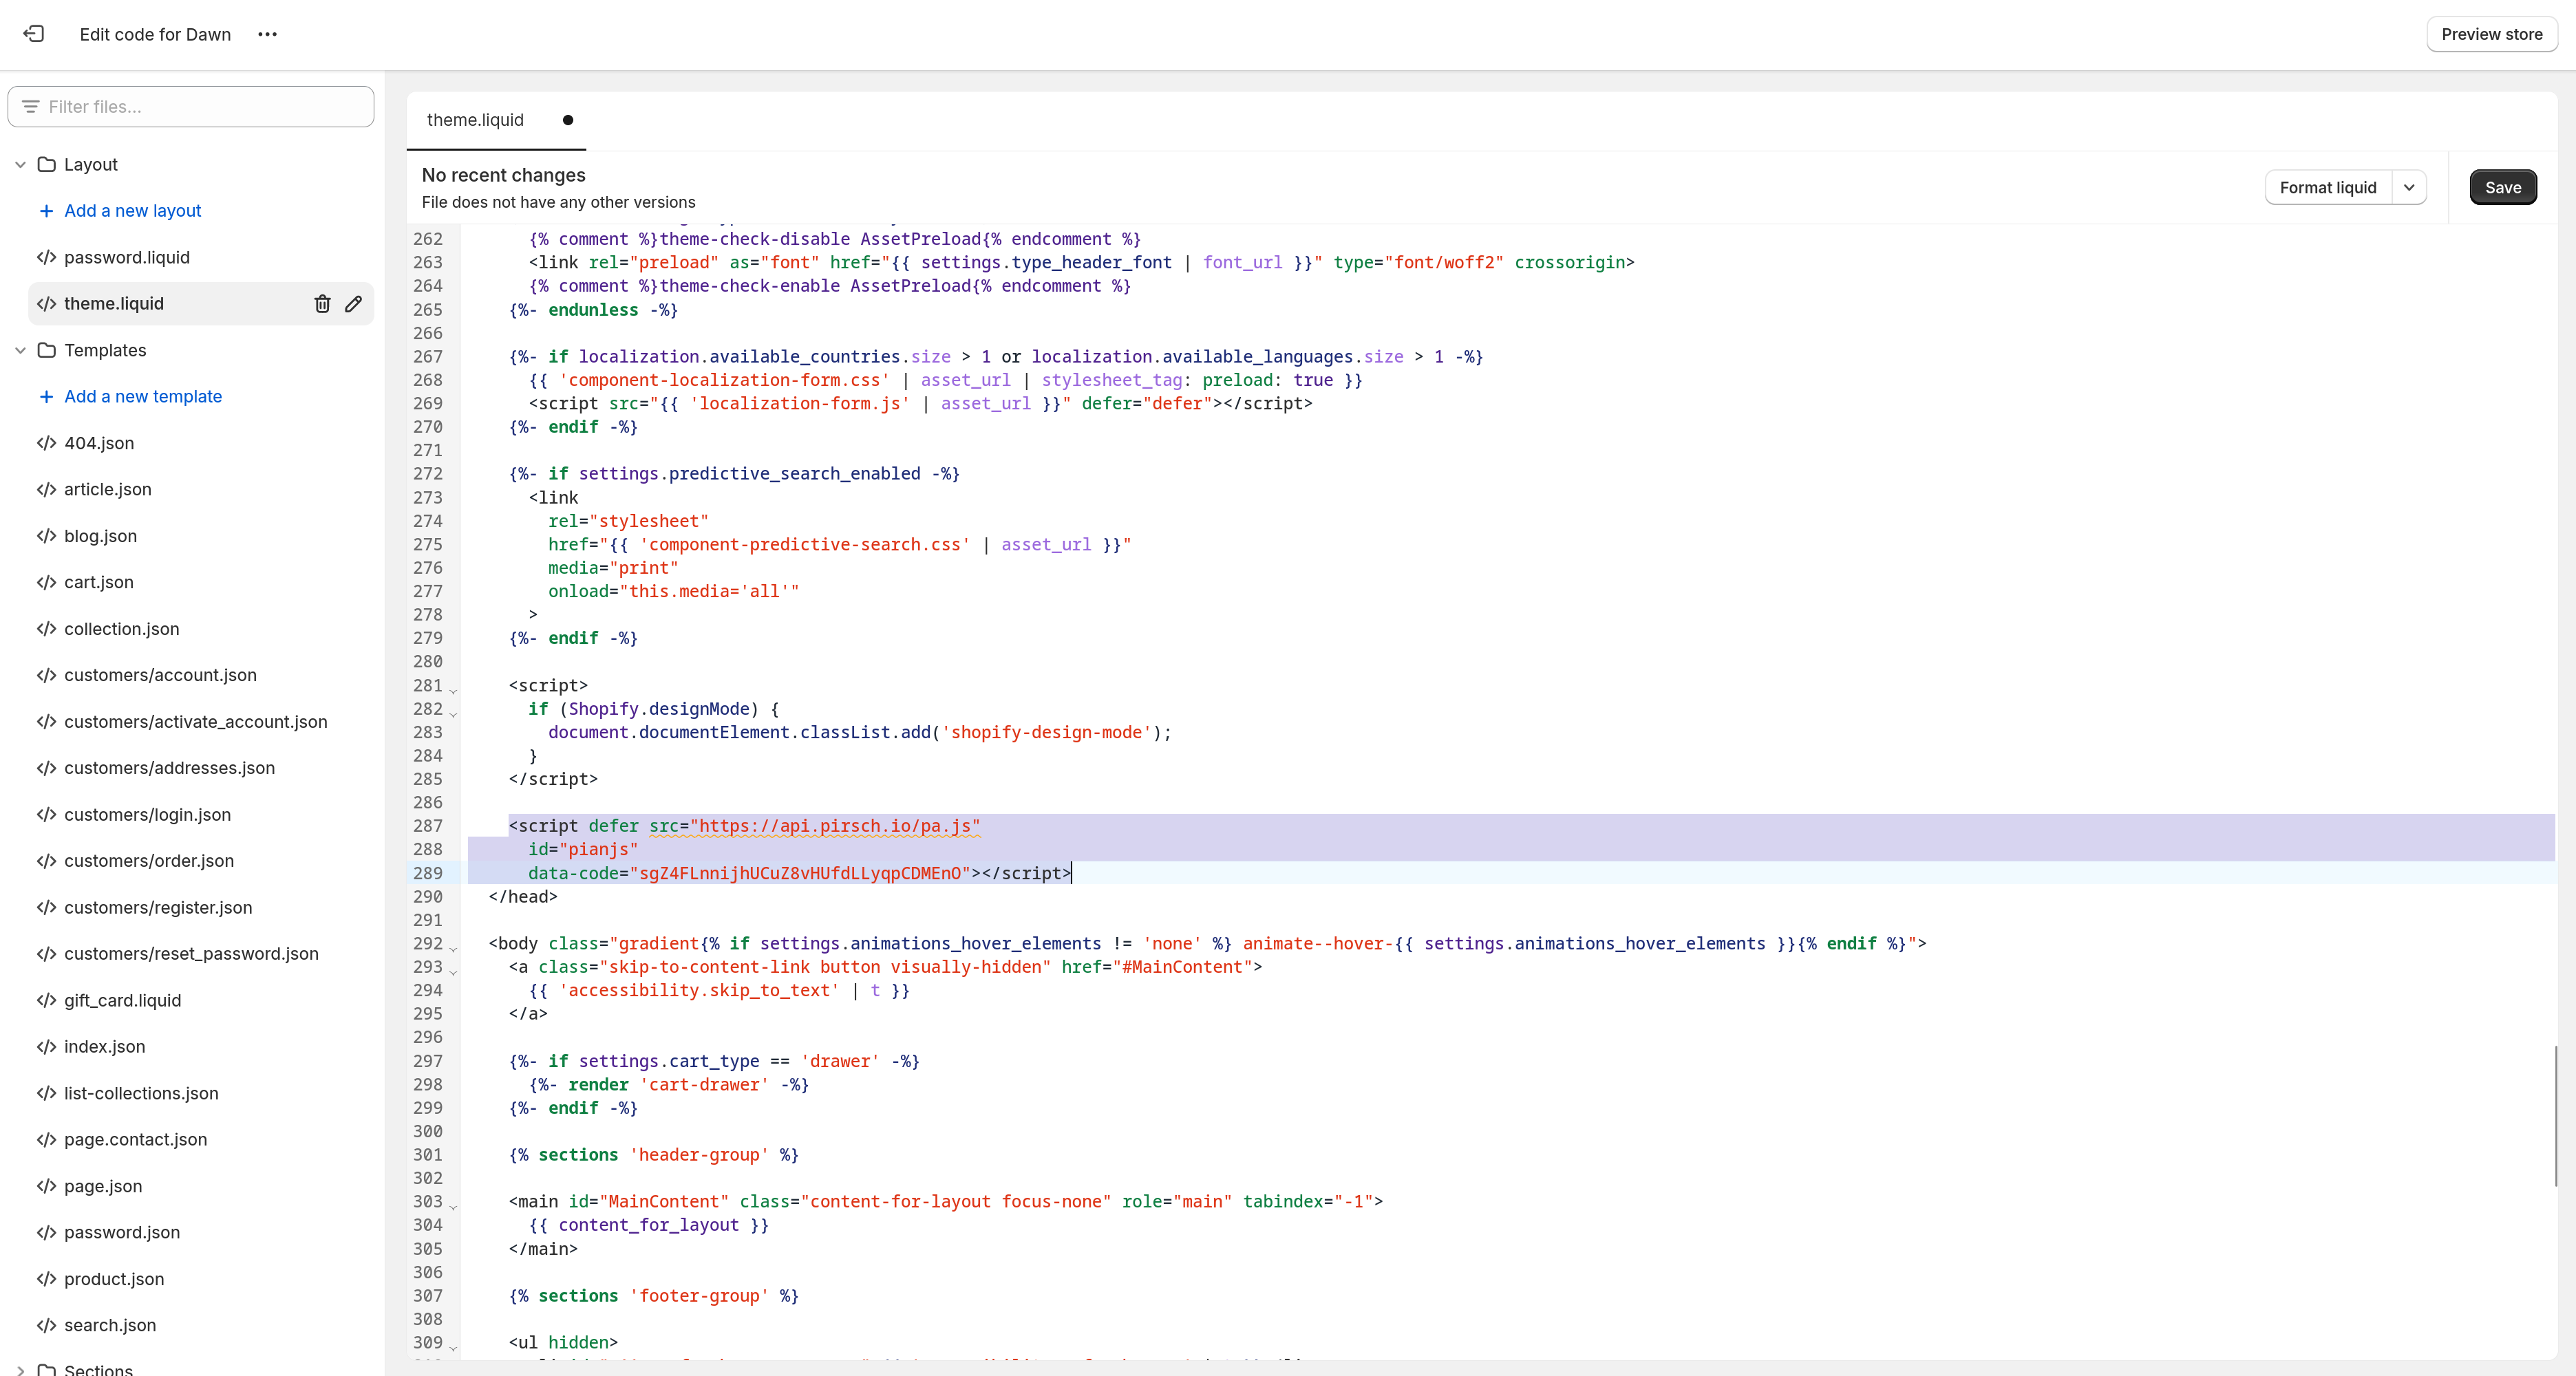
In the Layout folder, select theme.liquid. Scroll down until you see the end of the </head> section and paste your snippet just before the closing tag.
Adding the Snippet to the Checkout
To add the JavaScript snippet to the checkout pages, navigate to the Settings (from the bottom right corner) and select Customer events. Create a new script by clicking on Add custom pixel and typing Pirsch for the name.
![]()
On the next page, open the Permission and Data sale settings. Pirsch does not require consent for anonymized statistics (which is what page views are by default), so you can choose the last option for both.
![]()
The last step is to add the snippet using the code blow:
js
const script = document.createElement("script");
script.setAttribute("src", "https://api.pirsch.io/pa.js");
script.setAttribute("id", "pianjs");
script.setAttribute("async", "");
script.setAttribute("data-code", "YOUR_IDENTIFICATION_CODE");
document.head.appendChild(script);
Replace YOUR_IDENTIFICATION_CODE with your identification code from the snippet. If you have any options configured (like disabled features for example), add them as well using the setAttribute method.
Save your changes and you're done!
Testing the Integration
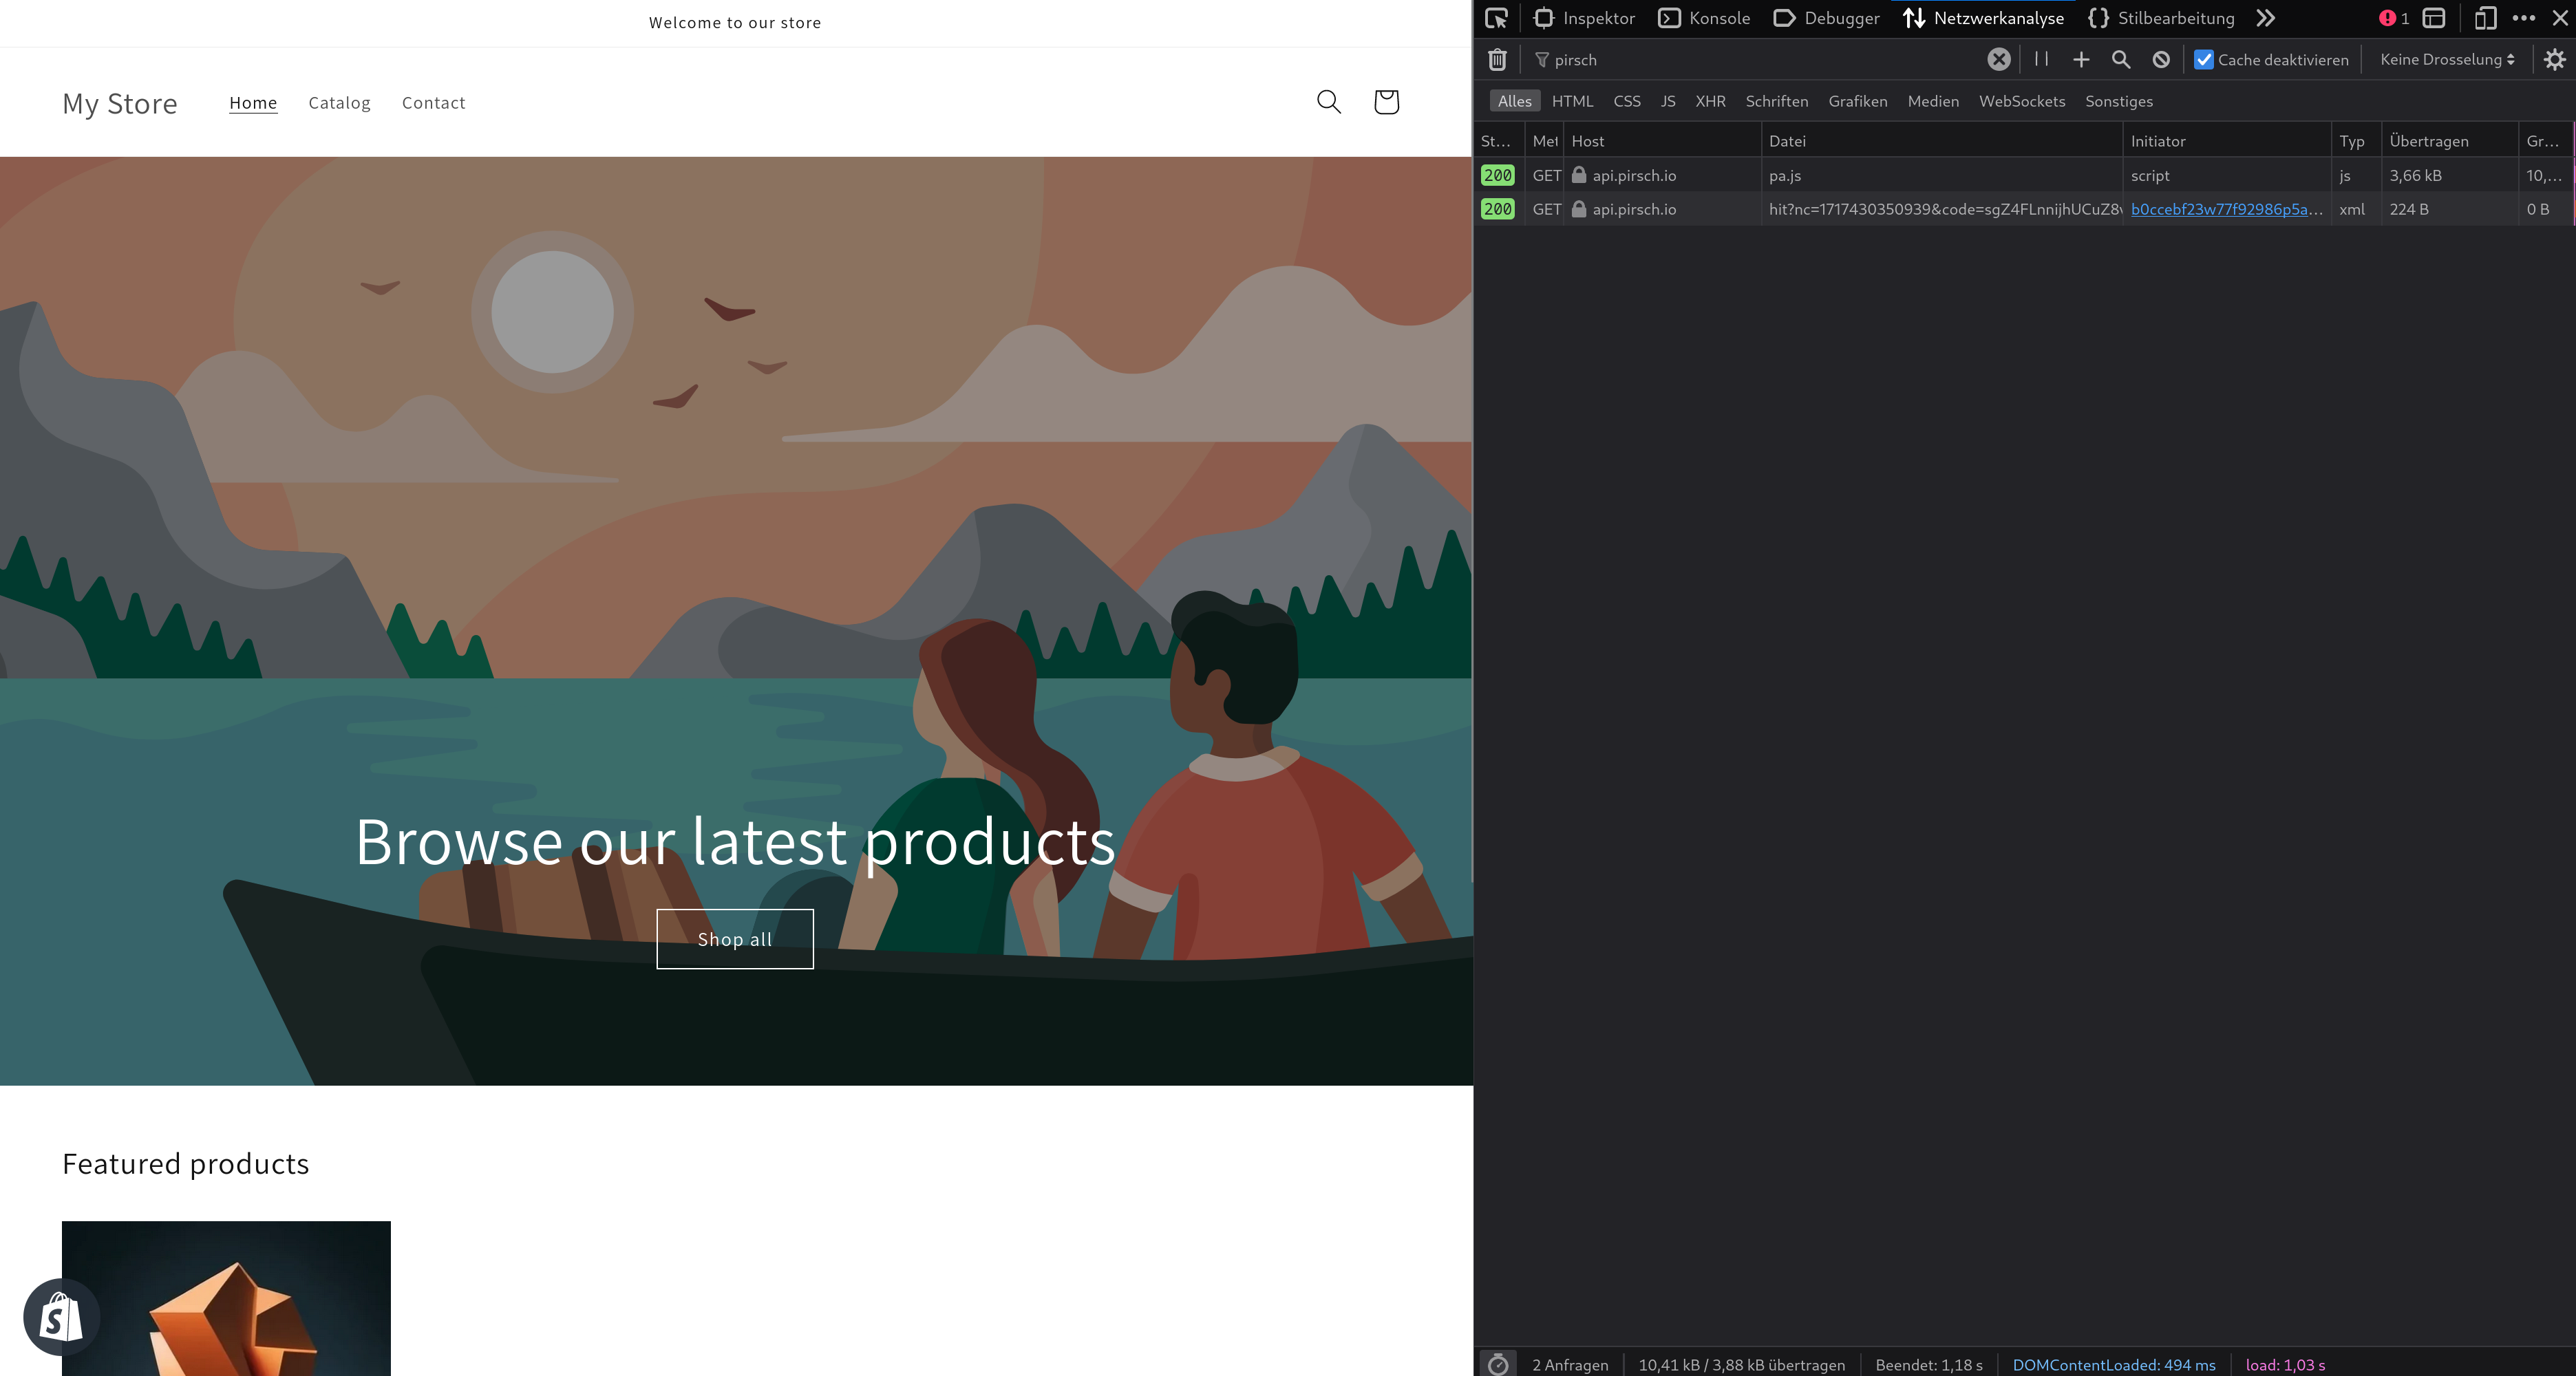
After you've added the snippet to your shop and checkout pages, you're ready to test the integration. Open your shop and the browser developer tools (usually by pressing Ctrl/Cmd + Shift + I).
You should see the Pirsch script loaded and a page view sent in the Network tab. If you don't, reload the page.
Tracking Custom Events
Custom events can be used to measure a number of different aspects of your store. Pirsch tracks a few things automatically, including outbound link clicks and file downloads.
You can add more events to your site using a JavaScript script. As an example, we'll use the Shop all button on the home page. Whenever it is clicked, an event is sent to Pirsch.
![]()
First, open the code for the template you want to modify. In the case of the button, this is image-banner.liquid. The code can be opened from the same settings you used to install the JavaScript snippet.
Once open, scroll down to the code for the button. Next, add the HTML attributes needed to track the event.
![]()
In this case, we add the attribute pirsch-event="Shop all" for the event and pirsch-meta-section="Image Banner" to track the section the event belongs to as meta data. Save the template.
There are other ways to track custom events. Using HTML attributes is one of the easier solutions. For more information, see the custom events article.
To see if it works, go to your store page and open your browser's developer tools. On the Network tab, uncheck Clear Logs. Click on the button and see if you can find the Pirsch event.
![]()
You should see the event appear on your dashboard.
![]()
When you expand the panel, you can see the metadata for the event.
![]()
Tracking Form Submissions
Tracking forms can be accomplished using custom events and a little JavaScript on your page. In this example, we'll use the newsletter signup form at the bottom of the page.
First, open your browser's developer tools to find the ID of the form you want to track.
![]()
In this case the ID is ContactFooter. Now open the theme.liquid file from the theme code settings and paste the code just before the closing </body> tag. The code can be opened from the same settings you used to install the JavaScript snippet.
js
<script>
    // Pirsch event tracking.
    const selector = [
        "#ContactFooter"
    ];

    document.addEventListener("DOMContentLoaded", () => {
        selector.forEach(s => {
            const element = document.querySelector(s);

            if (element.tagName === "FORM") {
                element.addEventListener("submit", e => {
                    const meta = {form: s};
                    const input = element.querySelectorAll("input");

                    input.forEach(i => {
                        const type = i.getAttribute("type").toLowerCase();

                        if (type !== "password" && type !== "hidden") {
                            const name = i.getAttribute("name");
                            meta[name] = i.value;
                        }
                    });

                    pirsch("Form Submission", {meta});
                });
            }

            // Handle other cases here...
            // For example, element.tagName === "A" to track link clicks.
        });
    });
</script>
This is what it would look like in the editor.
![]()
The script has a list of selectors at the top. You can add more if you want to track other forms as well. A selector that starts with # will search for an ID. You can use any selector that is supported by document.querySelector (learn more here).
It will then iterate through all the selectors and look for the element on the page. If it's present and of type FORM, it will attach an event listener to send a custom event to Pirsch whenever it is submitted. The script will automatically pick up all input fields in the form unless they are hidden or of type password.
Once added, save the changes and reload your shop page to test the integration. After submitting the newsletter subscription form, you should see an event in your Pirsch dashboard.
![]()
Please note that the script currently only supports forms. You can add more handlers if you want, e.g. for links or other elements on your page.
Tracking Sales and Revenue
Tracking sales and revenue works by sending a custom event to Pirsch every time a customer makes a purchase and setting a conversion goal on the dashboard. Let's take a look at the custom event implementation first.
Adding the Event
To add the event, you'll first need to add the JavaScript script snippet to the checkout pages. This is the same process as in the setup.
DANGER
If you include Personally Identifiable Information (PII) within the metadata fields, you will need to ask for consent. In this example the email address and order ID would count as PII.
You will also need to add a Shopify Pixel event. For checkout, this is checkout_completed. Use the following code to add a handler. For completes, it also includes the script snippet. Don't forget to replace the identification code with your own.
js
const script = document.createElement("script");
script.setAttribute("src", "https://api.pirsch.io/pa.js");
script.setAttribute("id", "pianjs");
script.setAttribute("async", "");
script.setAttribute("data-code", "YOUR_IDENTIFICATION_CODE");
document.head.appendChild(script);

analytics.subscribe("checkout_completed", event => {
    const checkout = event.data.checkout;

    pirsch("Purchase", {
        meta: {
            amount: checkout.totalPrice.amount,
            currency: checkout.currencyCode,
            email: checkout.email,
            order_id: checkout.order.id,
            item_count: checkout.lineItems.length
        }
    });
});
Once the code has been added and saved, go to your store and place a test order. On the confirmation page, you should see the event being sent to Pirsch in the network tab of your browser's developer tools.
![]()
Setting up the Conversion Goal
After the purchases are tracked by custom events, you can see them appear on the dashboard.
![]()
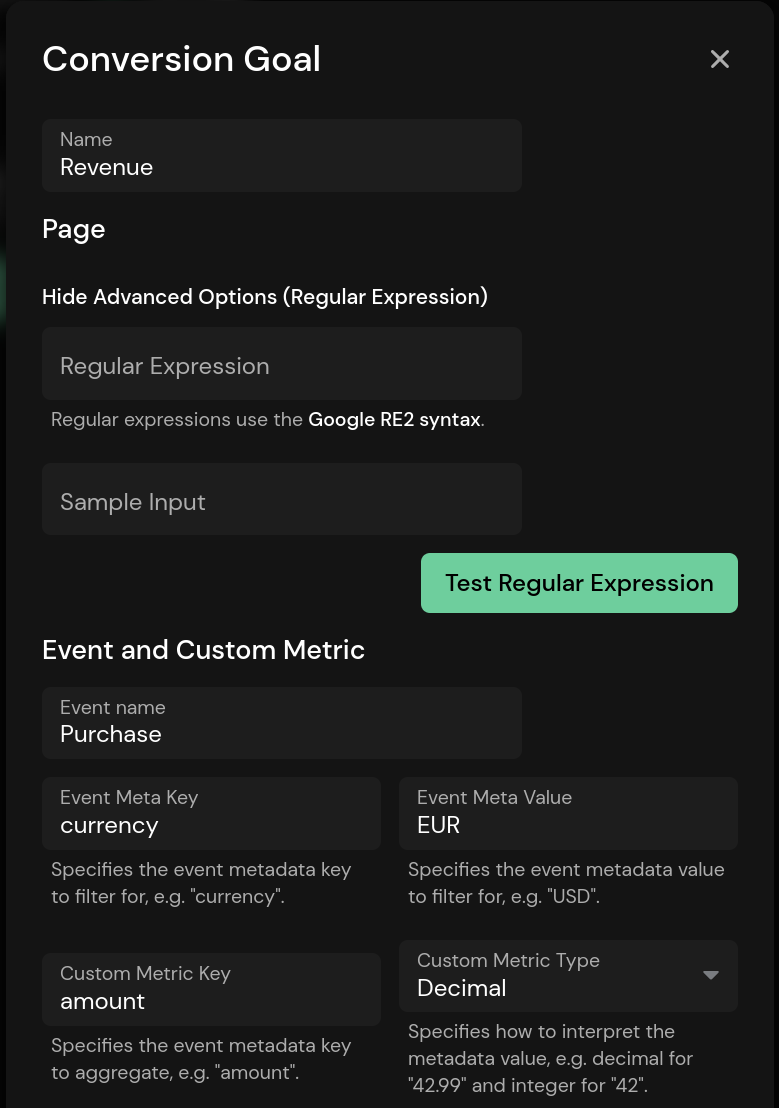
To track revenue over time, you can set up a conversion goal. In the Conversion Goals panel, click the + icon in the upper right corner. Enter a name and the Custom Metric details. The event name is Purchase, for the event meta key type currency and enter your desired currency (in this case EUR). For the custom metric key, type amount and select Decimal for the type. Save the goal.
You should now see your test purchase appear as 1 in the panel. If you click on the goal, the graphs will include the total and average revenue over time.
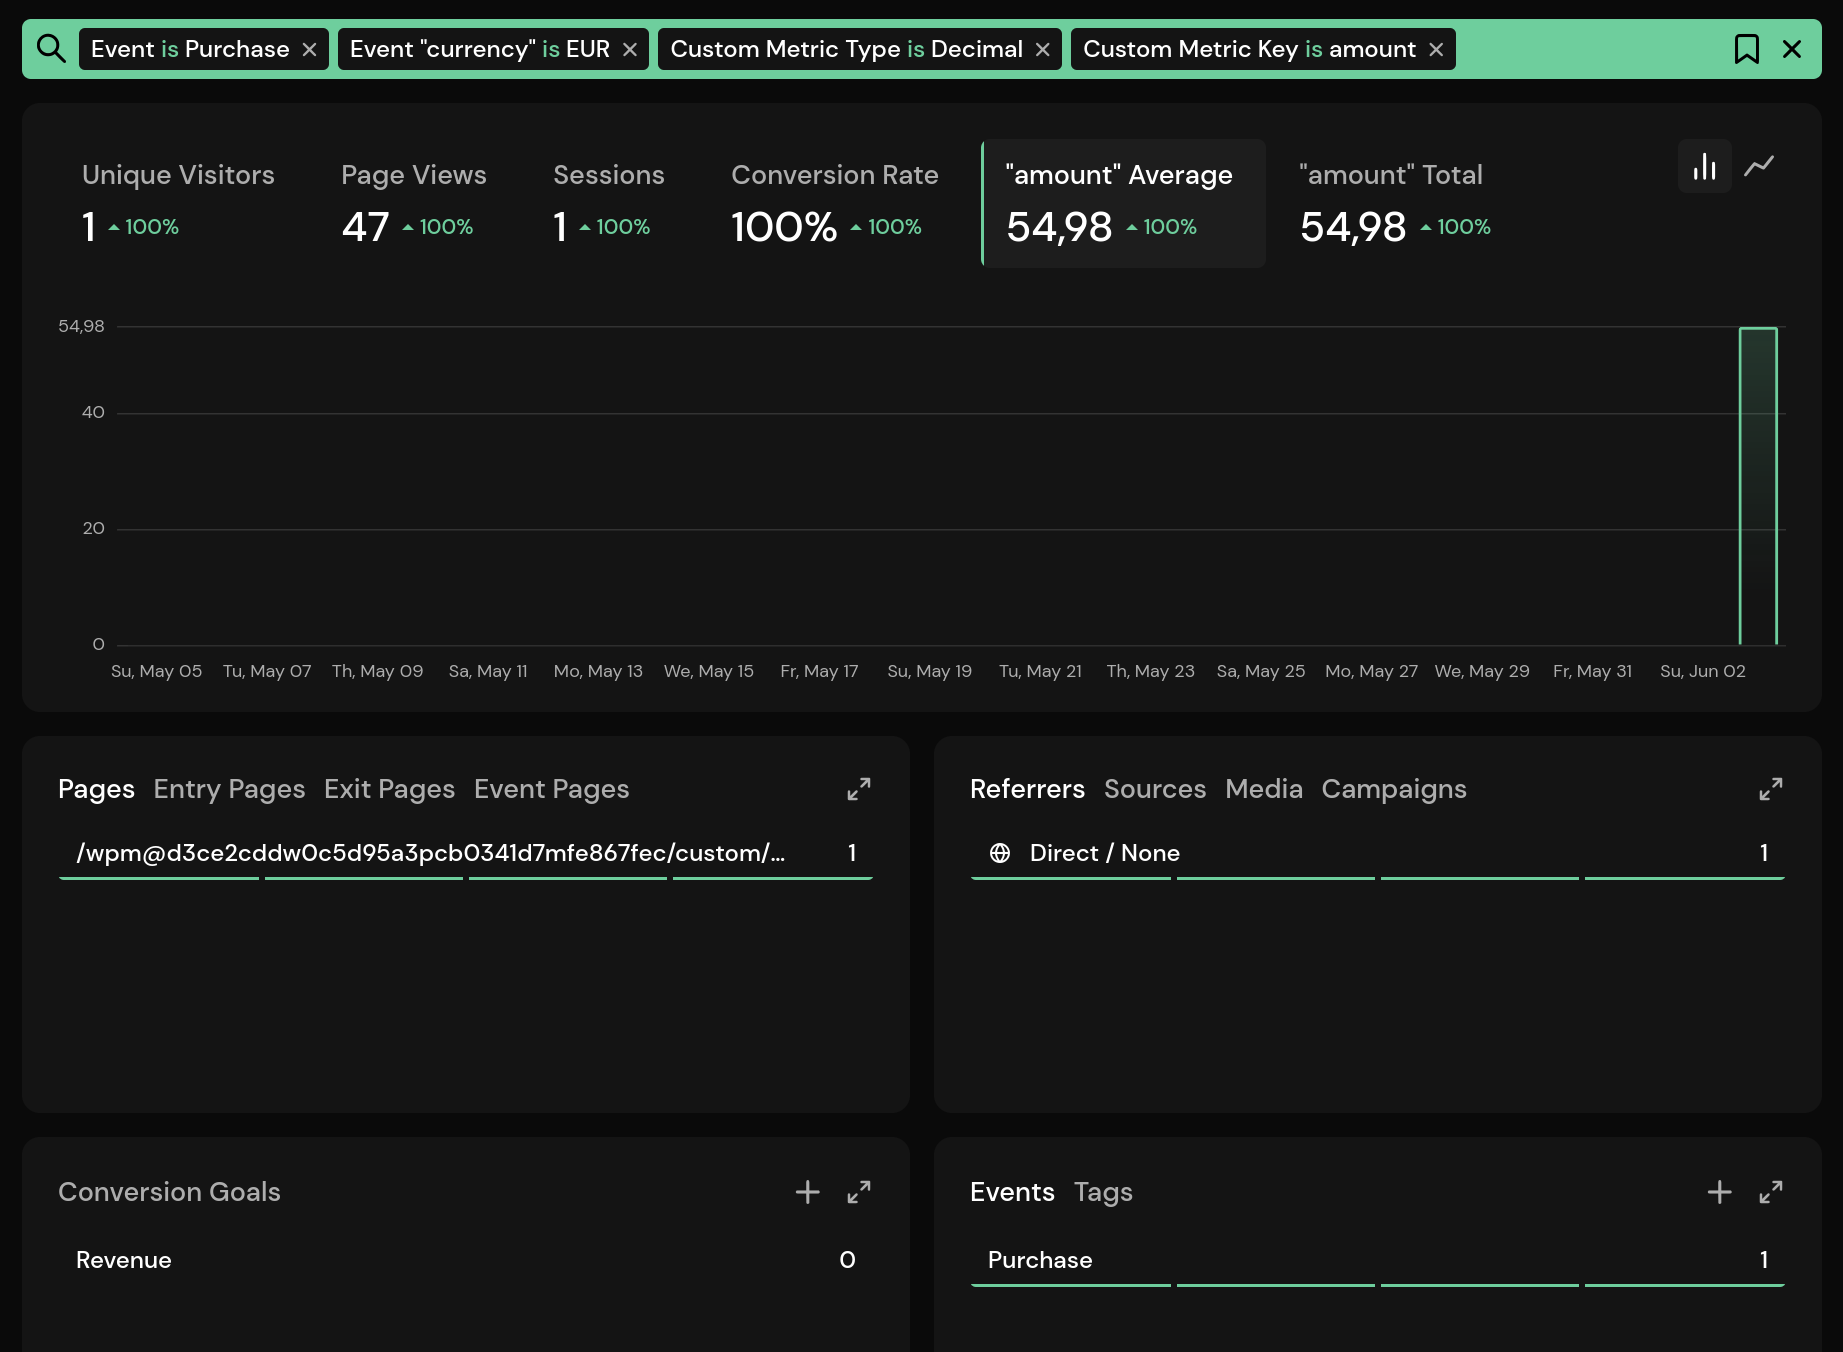
Of course, you can add more filters for deeper insights, such as ad campaign attribution.