Appearance
Server-side Integration
This guide assumes that you already created a dashboard for your website on Pirsch. If you didn't, please read the website integration article.
INFO
Looking for code? Check out our demo repository on GitHub!
Adding Pirsch to Your Backend
The server-side integration is the recommended way to integrate Pirsch into your website as it cannot be blocked by the browser. Instead of relying on JavaScript, you'll make a HTTP API request to track traffic.
Creating a Client
First, you need to create an access key or client ID and secret. We recommend using an access key, as that reduces the number of requests your server needs to make to our service.
- Open the dashboard and navigate to the Settings page for your site
- Under the Integration section and Clients, click Add Client
- Select Access Key, enter a description and click Create Client
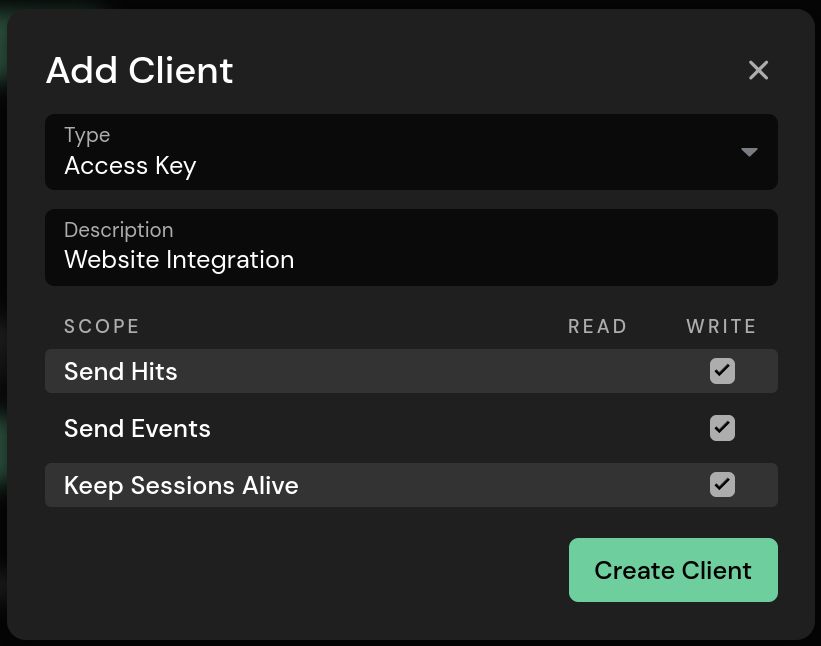
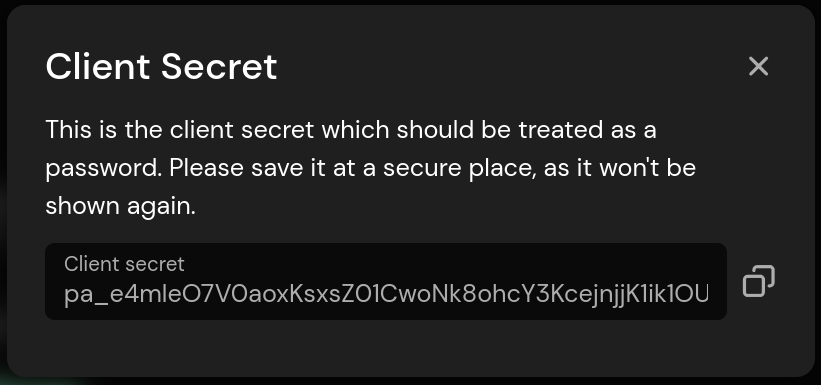
- This will open a new dialogue with the secret. Copy and save it in a safe place
Tracking Traffic
The example below shows how to make the API requests needed to get an access token and send a page request. This should be sufficient for most websites. For a full reference, see the API documentation. We also offer a range of SDKs to help you with the integration.
Getting an Access Token
INFO
Requesting an access token is only required if you created a client ID and secret. If you're using an access key (recommended), you can skip this step.
You need to fetch a new access token before making your first request and every time you receive a HTTP status code 401 (unauthorised).
Bash
POST https://api.pirsch.io/api/v1/token

{
    "client_id": "<client_id>",
    "client_secret": "<client_secret>"
}
This will return an access token like this.
Bash
{
    "access_token": "eyJhbGciOiJSUzI1NiIsInR5cCI...",
    "expires_at": "2020-12-12T00:11:39.903607271Z"
}
Tracking Page Views
To start tracking, send a page view everytime someone visits a page on your website. How you do this depends on the programming language and framework you're using. We recommend creating a middleware added to your router to handle it automatically for each page view.
If you created an access key, you can directly use that instead of the access token (eyJhbGciOiJSUzI1NiIsInR5cCI...) in the example below.
Bash
POST https://api.pirsch.io/api/v1/hit
Authorization: Bearer eyJhbGciOiJSUzI1NiIsInR5cCI...

{
    "url":                          "https://example.com/full/url?including=parameters",
    "ip":                           "123.456.789.0",
    "user_agent":                   "User-Agent header",
    "accept_language":              "Accept-Language header (optional)",
    "sec_ch_ua":                    "Sec-CH-UA header (optional)",
	"sec_ch_ua_mobile":             "Sec-CH-UA-Mobile header (optional)",
	"sec_ch_ua_platform":           "Sec-CH-UA-Platform header (optional)",
	"sec_ch_ua_platform_version":   "Sec-CH-UA-Platform-Version header (optional)",
	"sec_ch_width":                 "Sec-CH-Width header (optional)",
    "sec_ch_viewport_width":        "Sec-CH-Viewport-Width header (optional)",
    "referrer" :                    "Referer header (optional)",
    "tags": {
        "key": "value (optional)"
    }
}
As you can see, you need to send the visitor's IP, full URL, User-Agent header and a few other headers. Although only the IP, URL and User-Agent are required, we recommend that you send as many of these fields as possible as they improve the quality of the analytics data.
Don't worry, we don't store the IP address. To find out more, please read the privacy article.
Client Hints
Client Hints improve the accuracy of the statistics collected for you. Make sure to forward them to our service.
Privacy Policy
If required in your country, you can use our template to add a paragraph to your privacy policy about the use of Pirsch.