Appearance
API Guide
In this guide you'll learn how to use the API. The full reference can be found here.
INFO
A demo repository can be found on GitHub.
Accessing the API
Clients are used to access the API. You'll need one if you want to use the server-side integration or if you want to access your data from an external application. They have predefined scopes and can be created for a dashboard or for your account.
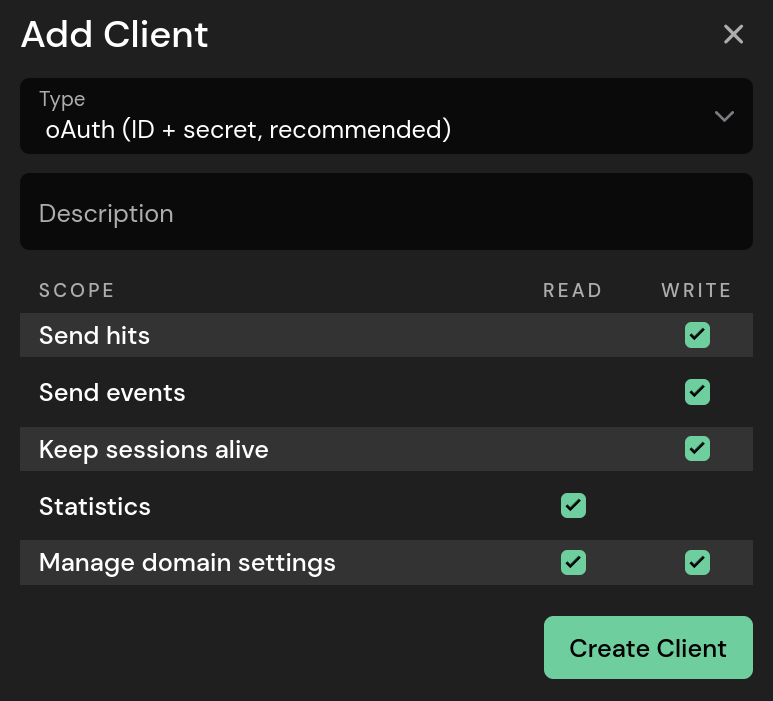
To create a new client, navigate to the Integration Settings or Account Settings page and click Add Client. Select the type, scope, and enter a description. A client created on the Account Settings page can access everything and has essentially the same permissions as your account.
The scopes define the client's capabilities. You can create a read-only client by disabling all write operations.
The type can be either oAuth or Access Key. An oAuth client requires you to get an access token before you can make any authorized requests. The Access Key type can be used for write-only operations. It only has a secret and doesn't require you to request an access token first, which is useful for stateless applications such as a PHP client that cannot reuse an access token multiple times.

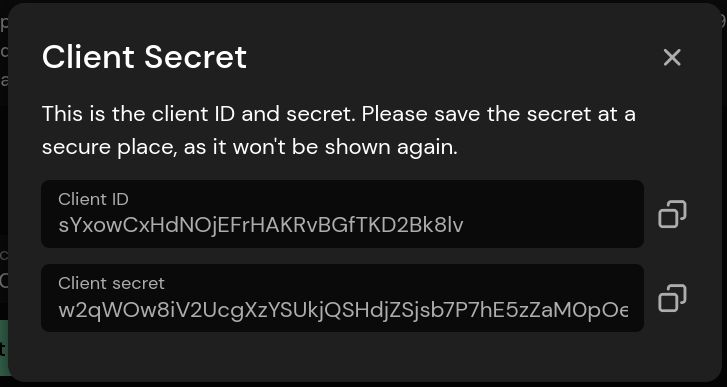
The dialog that appears after the client is created shows the client ID and the secret. Save the secret in a safe place. Once the dialog is closed, there is no way to retrieve the secret. If you lose it, you must create a new client.

Once you have obtained a client ID + secret or an access key, you can start using the API.
Rate Limits
The following limitations must be considered when using the API:
- All security-related endpoints (login, password reset, etc.) have a rate limit of 10 requests per minute.
- All non-security configuration endpoints (adding email reports and the like) have a rate limit of 60 requests per minute.
- All statistics, data collection, and related endpoints (sending page views, reading visitors, referrers, funnels, views, etc.) currently have no rate limit. However, this may change in the future.
It is highly unlikely that you will hit the rate limit. Especially since we currently don't enforce a limit for reading statistics. However, if you do run into it, you can check the following headers to make sure you stay within the limits:
- X-RateLimit-Limit: is the absolute maximum number of requests per minute.
- X-RateLimit-Remaining: the number of requests per minute remaining (sliding window)
- X-RateLimit-Reset: a timestamp when the limit will be reset
- Retry-After: the time to retry the request if you hit the limit
Getting an Access Token
If you are using the oAuth client type, you must obtain an access token before making any subsequent API requests. The access token must be sent with each request in the Authorization header in the format Bearer <token>. If you receive a 401 (unauthorized) status code, you'll need to request a new token and try again. The expires_at timezone is set to UTC.
Access keys (starting with pa_) don't require querying an access token first, but can only be used to send data (page views, events, and keep-alive sessions).
Treat both, client secrets and individual access tokens, as passwords and store them securely.
POST https://api.pirsch.io/api/v1/token
EXAMPLE REQUEST
JSON
{
    "client_id": "<client_id>",
    "client_secret": "<client_secret>"
}
EXAMPLE RESPONSE
JSON
{
    "access_token": "eyJhbGciOiJSUzI1NiIsInR5cCI...",
    "expires_at": "2023-07-24T00:11:39.903607271Z"
}
Keep the access token in a safe place. The token will remain valid until expires_at is reached.
Using the API
There are two sample requests in this section:
- Sending a page view
- Reading statistics
See the API reference for a list of available endpoints.
Error Handling
Before we get into using the API, let's first talk about error handling.
In case of an error, Pirsch returns a JSON object in the body describing the problem and what you can do about it, along with a meaningful HTTP status code. Errors have the following structure.
JSON
{
    "validation": {
        "field": "error message"
    },
    "error": [
        "error message"
    ],
    "context": {
        "key": "value"
    }
}validationlists errors related to parameterserrorlists general errors, like when an object can't be found. There is usually only one error messagecontextgives context information. This is a key-value list where the value can be a string, number, array, or any other valid JSON type
Getting the Domain ID
Most API endpoints require you to set a domain ID. We call them domains, but you can also think of them as a single dashboard. The terms are used interchangeably.
For clients created for a dashboard, only one domain is returned. For clients created on the account settings page, this endpoint returns all domains that you have access to.
Don't forget to set the access token or access key in the Authorization header: Bearer <oAuth access token or access key>.
GET /api/v1/domain
EXAMPLE RESPONSE
JSON
[
    {
        "id": "A5kgYzK14m",
        "def_time": "2021-05-22T10:11:12.123456Z",
        "mod_time": "2021-05-22T10:11:12.123456Z",
        "user_id": "pzy1bjD1lv",
        "organization_id": null,
        "hostname": "example.com",
        "subdomain": "example",
        "identification_code": "oSdiAe...",
        "public": false,
        "google_user_id": null,
        "google_user_email": null,
        "gsc_domain": null,
        "new_owner": null,
        "timezone": "Europe/Berlin",
	    "group_by_title": false,
	    "active_visitors_seconds": 600,
        "disable_scripts": false,
        "statistics_start": null,
        "imported_statistics": false,
        "metadata": {},
        "theme_id": "x98y1bjAm72",
	    "theme": {
            // key value pairs
        },
        "custom_domain": "my.custom-domain.com",
        "user_role": "Owner", // Admin, Viewer
        "settings": {},
        "theme_settings": {
            // key value pairs
        },
        "display_name": "My Website",
        "subscription_active": true
    }
]
As you can see, this will return a list of domains. Store the id for later use.
INFO
Arrays can be null or empty, you should make sure to check both!
Sending a Page View
Let's send a simple page view. This is usually done from your server (server-side integration).
POST https://api.pirsch.io/api/v1/hit
EXAMPLE REQUEST
JSON
{
    "url":                          "https://example.com/full/url?including=parameters",
    "ip":                           "123.456.789.0",
    "user_agent":                   "User-Agent header",
    "accept_language":              "Accept-Language header (optional)",
    "sec_ch_ua":                    "Sec-CH-UA header (optional)",
	"sec_ch_ua_mobile":             "Sec-CH-UA-Mobile header (optional)",
	"sec_ch_ua_platform":           "Sec-CH-UA-Platform header (optional)",
	"sec_ch_ua_platform_version":   "Sec-CH-UA-Platform-Version header (optional)",
	"sec_ch_width":                 "Sec-CH-Width header (optional)",
    "sec_ch_viewport_width":        "Sec-CH-Viewport-Width header (optional)",
    "title":                        "Page title (optional)",
    "referrer" :                    "Referer header (optional)",
    "screen_width":                 1920,
    "screen_height":                1080,
    "tags": {
        "author": "John",
        "post": "My first blogpost"
    },
    "disable_bot_filter": false
}
As you can see, you need to send us information about the visitor's request. Your server essentially acts as a proxy, forwarding the same information that we receive when the JavaScript snippets request our service directly. If you wish, you can disable the bot filters. However, we do not recommend this. If you are tracking an application in a well-controlled environment though, you might be able to prevent some false positives by setting the option to true.
How you get these fields depends on your framework and programming language. Here is a simple example for PHP.
php
$request = array(
    // Construct the URL.
    'url' => 'http'.(isset($_SERVER['HTTPS']) ? 's' : '').'://'.$_SERVER['HTTP_HOST'].$_SERVER['REQUEST_URI'],

    // Use the remote IP or a header in case your server is behind a proxy or load balancer.
    'ip' => $_SERVER['REMOTE_ADDR'],

    // Set the User-Agent.
    'user_agent' => $_SERVER['HTTP_USER_AGENT'],

    // Set the Accept-Language header.
    'accept_language' => $_SERVER['HTTP_ACCEPT_LANGUAGE'],

    // Set the client hint headers.
    'sec_ch_ua' => $_SERVER['Sec-CH-UA'],
	'sec_ch_ua_mobile' => $_SERVER['Sec-CH-UA-Mobile'],
	'sec_ch_ua_platform' => $_SERVER['Sec-CH-UA-Platform'],
	'sec_ch_ua_platform_version' => $_SERVER['Sec-CH-UA-Platform-Version'],
	'sec_ch_width' => $_SERVER['Sec-CH-Width'],
    'sec_ch_viewport_width' => $_SERVER['Sec-CH-Viewport-Width'],

    // Set the referrer. Maybe from a query parameter, like: ?ref=My+Referrer
    'referrer' => $_SERVER['HTTP_REFERER'],

    // Other optional fields...
);

// Use $request to send the data to Pirsch.
If your server is behind a load balancer or proxy, make sure you are using the correct header for the IP address. Most proxies set the X-Forwarded-IP header, which contains the real IP. You'll probably need to extract it by parsing the header.
It's also possible to send multiple page views at once using the batch endpoint.
POST https://api.pirsch.io/api/v1/hit/batch
EXAMPLE REQUEST
JSON
[
    {
        // Same parameters as for singe page views, plus the time the request was made to your server.
        "time": "2023-01-02T14:15:32Z"
    },
    // ...
]
Reading Statistics
In this example, we're going to read statistics. You can use this to create custom reports, dashboards, export data, or provide access to your clients.
Reading statistics requires the following information:
- The domain ID
- A filter
- A valid oAuth access token
Let's use the visitor endpoint to get general information about a site's performance.
GET /api/v1/statistics/visitor?id=A5kgYzK14m&from=2023-01-01&to=2023-03-01
EXAMPLE RESPONSE
JSON
[
    {
        "day": "2023-01-01T00:00:00Z",
        "week": null,
        "month": null,
        "year": null,
        "visitors": 42,
        "views": 56,
        "sessions": 48,
        "bounces": 23,
        "bounce_rate": 0.4791
    },
    // ...
]
In this example, the domain ID is A5kgYzK14m and there is only a start and end date (both required) for the beginning of 2023. The response is a list of days and their corresponding visitor count, view count, session count, and bounce rate. By default, the scale is set to day, which means that the week, month and year fields are set to null. If you aggregate by a different scale, the appropriate field will be set and day will be null.
The results can be further broken down by adding more filters. For example, adding &language=en will return results for English speaking visitors only. You can add multiple filters of the same type. Adding &city=London&city=Berlin will only return results for visitors from London or Berlin.
A full list of parameters can be found in the API Reference.
